
My mission: to recreate missing buttons for an eighteenth-century waistcoat in time for the opening of Fashioning Fashion earlier this month. Here was a six-button waistcoat with not one, but three missing delicately crafted buttons.
 01.M80_60a-b
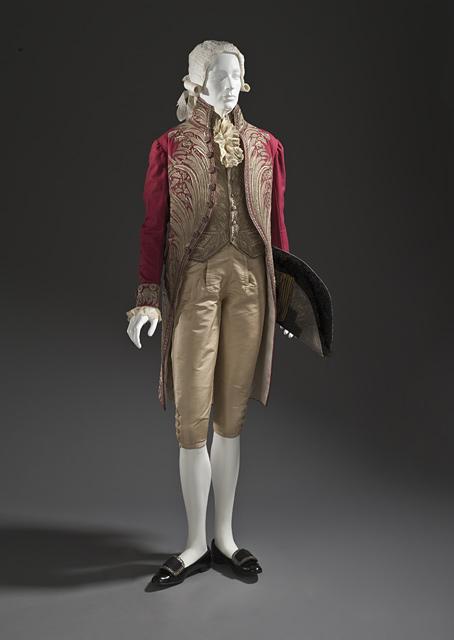
- Man’s Coat and Vest, Italy, c. 1800, Costume Council Fund
The bottom half of the buttons seemed easy enough—silk fabric pulled over a flat disk form, somewhat loose at the bottom for sewing the buttons onto the vest.
The challenge was the top half of the existing buttons. They were very delicate, embroidered with shimmering aged silver metallic filaments that were fashioned into an intricate pattern. It was very unlikely that I could replicate, in the same material, the detailed design much less match the color of the oxidized silver strands. I might have attempted it if only one button was missing, but I needed to make the three replacements quickly.
Making a silicone mold from an original button was not an option, so I sculpted an epoxy putty model of one of the original buttons. It was impossible to create an exact copy because of the numerous fine lines making up the pattern. The epoxy putty crumbled when I tried duplicating the thin filaments laying side-by-side. After sculpting an acceptable model of the top half of the button, I made a silicone mold for casting the buttons, mixing up a two-part system and letting it cure.
I removed the model button and cast the replicas in epoxy putty. It was quite easy to push the mixture into the negative hollow of the mold. I removed each epoxy button form before it completely hardened to allow me to work a little more detail into each.

The pink silicon mold was made from a sculpted copy of an original button. Here the mold is used to cast three reproduction buttons using epoxy putty.

The epoxy button was removed from the mold before it was completely cured. Modeling tools were used to sharpen the details.
Then I toned the fabricated buttons with watercolors and Mica pigment. I applied thin layers of paint, gradually adding more color, to imitate the shade and depth of the original silver strands. As a protective layer, I sprayed Testors Dull Coat on top of the painted button forms.

After curing, the cast epoxy button was toned to match the original buttons with mica pigment and water colors.
Lastly, I joined the top and bottom half of the button sections together using PVA adhesive. The buttons were now complete. Mission accomplished!

Can you spot the fake buttons?
(Counting from the top: #1, #4, and #5 are reproductions.)
Thanks to Catherine McLean, senior conservator and head of Textile Conservation, for documenting the process.