
This summer, LACMA launched the YouTube series ART + WORK, which shows the care that museum conservators put into preserving a wide range of artworks from our permanent collection.
In this video, Paintings Conservator Elma O’Donoghue carefully treats visible cracks on the surface of Piet Mondrian's Composition in White, Red and Yellow (1936).
Below, Elma explains more about this very detailed process.
Why did conservators and curators decide to treat the cracks in this painting?
This painting has hung in our galleries for a very long time, and it's been very difficult to light it in a way that would minimize the cracking. The cracking really interferes with one's ability to appreciate the painting. It's very distracting. We were very recently reinstalling our Modern Art galleries, and the idea was to try and regain some of the painting’s original appearance so that it could be viewed in the galleries.
Tell us a little about the adhesive you are using on the cracks.
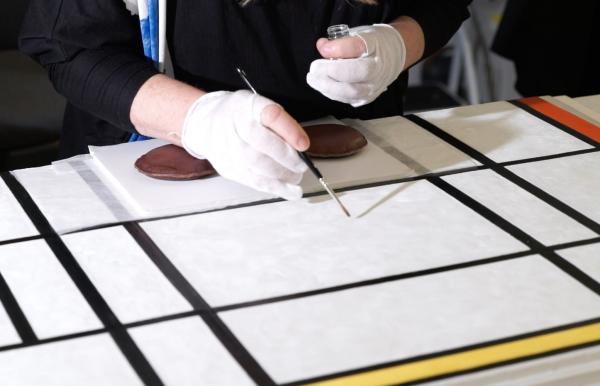
The adhesive I'm using in this case is called isinglass. It's a very purified fish glue that's made from the bladder of a sturgeon fish. It's used in conservation a lot because it's quite strong and can be used in very low percentage concentrations and still be very effective. It's also got some very good aging properties. It doesn't discolor like other glues do, it's reversible, and it's fairly compatible with lots of other materials that are used in conservation.
Before applying the adhesive to the crack, I apply ethanol which helps draw in the adhesive. Using a fine paintbrush, I apply warmed isinglass to the cracks, and it gets wicked in through the crack, into the sides of the crack and into the canvas. The goal is to have the adhesive get to the edges of the crack and then in under the lifted paint, and then it probably also goes through to the reverse of the canvas. But the main idea is that it's on the inside edges of each side of the crack, and later when I apply heat and pressure, hopefully the edges of the crack will stick together and the crack will become narrower. This means it will be less visible.
Lastly, I always make sure to remove any residual adhesive that is on the face of the painting. Isinglass is shiny and eventually could slightly yellow or become less soluble with age. Because of that, you don’t want any remaining. Using a little patch of Evalon, I absorb any residual wet glue that's on the paint surface and then follow with another patch of Evalon, slightly moistened with warm water.

 and after (R) treatment. Piet Mondrian, Composition in White, Red, and Yellow, 1936, Los Angeles County Museum of Art, Mr. and Mrs. William Preston Harrison Collection, photo © Museum Associates/LACMA")
How do you ensure that the cracks you treat flatten?
I can't successfully flatten these cracks without massaging them, and I can't massage the paint until it is slightly flexible and warm. Otherwise this treatment could cause more cracking. Dried oil paint is generally a brittle material. If you were to apply pressure to the paint, you could end up introducing a lot more cracking.
I’ve already humidified the paint and canvas by applying moisture to the reverse of the painting. So the next step is to warm up the paint a little, and I found that this can be achieved with a hairdryer on low heat. I don't keep the hairdryer on one spot because it could get too hot. I move it over the area where the cracks are and then, at the same time that it's beginning to heat up, I apply gentle pressure with my fingertips. The paint is now more flexible so there's less chance of causing new cracks and I’m able to set existing cracks, that are slightly lifted and very obvious, back down.
Why are your fingers not in gloves in this part of the treatment?
The reason I'm not using a glove when I'm applying the finger pressure is that I need to be sensitive to the paint. You can feel if you’re putting too much pressure more immediately when your fingertips are uncovered. But your fingers have to be immaculately clean and you have to keep cleaning them as you work. You don't want any oils from your hands getting onto the paint surface.

How did you decide to use this particular treatment on the painting?
This treatment is a little bit of a mix of different techniques that have been used in conservation, which I've picked up from working with various conservators. Some conservators have used moisture to flatten cracks. Others have used heated spatulas, for instance, to set down cracks, but the problem with using a heated spatula on a painting like this is that the white paint, which you can't really see in this video, has a strong verticle brush texture that goes from the bottom of the painting to the top. Each of these rectangles has vertical brush applications of paint. If I was to use something like a hot heated spatula, I would probably flatten the tops of the brush texture in the paint, which would not be a very good thing to do at all. That's why I'm using the hairdryer. It’s not directly in contact with the paint surface. I sort of combined these techniques and they're things we all use a lot. For some reason, this combination seemed to work on this Mondrian very well.