
The LACMA team is working together from our respective homes to bring you interesting content and creative activities while the museum is temporarily closed to the public. We may not be able to gather together, but we can still create something beautiful.
Do you have a pile of old clothes lying around your closet that you no longer wear? Ever wonder what to do with all those old towels, rags, or fabric scraps floating around your house? Let’s explore the art of quilt making and find out how to give new flare to your old cloth scraps!
In this fun family activity, you will create a collaborative, hanging art quilt that touches upon themes of family and community. Inspired by the improvised patterns and geometric designs found in the unconventional quilts of artist Rosie Lee Tompkins, you will use an array of recycled materials, while experimenting with patterns, shapes, and colors to improvise your own designs.
First, gather your supplies. Make sure to gather enough for the whole family for a collaborative hanging art quilt!

Materials:
- Recycled fabric scraps: No need for new fabric! You can cut up old shirts with cool patterns, colorful socks, dish cloths, etc.
- Decorative items: Yarn, twine, or ribbon
- Tools for cutting: scissors
- Adhesives: Elmer’s glue, mod podge, or any glue you can find!
- Strong cloth for your panel surface: This can be canvas fabric, denim, burlap, or even an old blanket you can cut up into panels
- Fasteners: Safety pins or a stapler
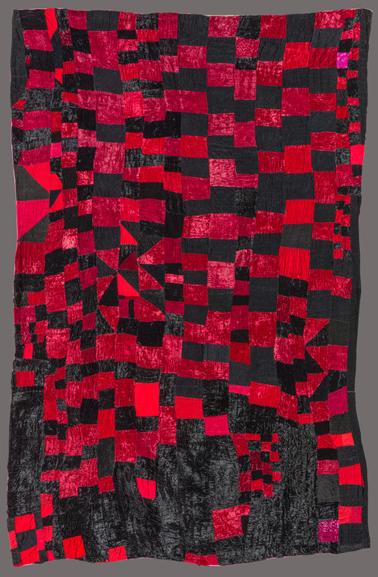
Next, take a close look at the large hanging quilt by Rosie Lee Tompkins.
What do the colors, shapes, and patterns reveal to you? How does this compare or contrast to other quilts you have seen?

Rosie Lee Tompkins grew up making quilts with her mother. They gave new life to old clothes, linens, and worn rags by recycling them into quilts as works of art. Tompkins continued this family tradition in her own work, recycling pieces from her home and wardrobe, old clothes from friends, and fabrics from community thrift stores. She did not plan her quilts in advance and often let her spirituality guide her designs.
Now, make your own quilt with these quick steps!
Step 1: Have each family member choose their cloth surface panel to work from. These panels can be cut into any size.

Step 2: Arrange your cut panels together to see how they will fit side by side—vertically or horizontally. The pieces don’t have to fit into a traditional square or rectangle. The shape of your quilt can be any shape you want!
Step 3: Cut or rip your fabric pieces into different shapes and try overlapping your pieces in some areas. Then, attach your collaged pieces with glue onto your surface. Notice how the colors, shapes, and patterns work together.

Step 4: Add ribbon, yarn, or thinly cut pieces of fabric to add a variety of lines over the surface.
Step 5: Safety pin or staple all your panels together into a composition of your choice. Discuss among your family members how your quilt represents your family, culture, or community.
Step 6: Finally, hang your quilt somewhere in your house to show off your collaborative work of art!

Please share your collaborative family quilt on social media and be sure to tag us @LACMA!