
This summer, LACMA launched the YouTube series ART + WORK, which shows the care that museum conservators put into preserving a wide range of artworks from our permanent collection.
In this video, Staphany Cheng, former Andrew W. Mellon Fellow, repairs a fragile 18th-century Russian altarpiece. She is preparing the textile for an upcoming exhibition by reattaching the metallic fringe to the edge of the textile.
Below, Staphany discusses the delicate nature of this stitching process.
Tell us about the artwork you are working on today.
The artwork I am working on today is an early 18th-century altarpiece from Russia. It is going into an exhibition scheduled for this fall.
The altarpiece has a really interesting brocade weave structure with a blue chenille background. The dark blue sections really bring out the shine of the metallic threads. You can imagine the altarpiece being displayed in a church, catching the flickering candlelight. It really is quite a sumptuous piece that would have caught everyone’s attention.
How did you begin working on the altarpiece?
When this altarpiece was first brought to the conservation studio, I conducted a condition check. The textile was in good overall condition, but we noticed that there were sections of creasing and distortion throughout the brocade layer and along the metallic ribbon. We suspect that this textile had been stored folded at some point of the object’s life. To address these, I treated them with localized passive humidification, which is a slow introduction of water molecules into these areas to rehydrate the fibers. This process relaxes and reshapes the weave while also flattening the object overall.
The second concerning aspect of the altarpiece’s condition was the passementerie, the metallic ribbon and fringing that is located along the outer edge of the textile. I was able to tell from the different threads used in these areas that the ribbon and fringing had been reattached several times before. Several areas of these previous stitches have broken and become missing, resulting in the detachment of these decorative elements. In this video, I am reattaching the loose sections with conservation stitching.
How do you select the thread that you will be stitching with?
For this treatment I was able to look through the silk threads that we currently have in the LACMA textile conservation studio. When choosing support material, we look for materials that are similar to the textile that we are working on in both a physical sense, for example fiber type and thickness, and also in an aesthetic sense. Ethically, it is important for conservation stitching to be discernible from previous and original stitching. Careful documentation of the treated areas will allow future researchers and conservators to quickly identify these areas so that the artwork and its construction will not be misinterpreted. However, we also want our stitching to be compatible with the work so that any conservation stitching will not disrupt or distract from the viewers experience of the textile.
This altarpiece consists of silk and metallic ribbon and fringing, which are all materials that have reflective qualities to them. For this reason, I selected a silk thread that is of similar thickness to the thread that was used previously on this textile. This way the new stitches will have a similar strength to areas that do not require treatment and have the same sort of luster and shine as other areas of the textile.
As I mentioned previously, color matching the right thread is also challenging. It is important to consider the lighting in the galleries and how the artwork will be displayed. I have found with textiles that have metallic components, it is better to pick a darker color than you expect as under gallery lights. They will tend to fade into the shadows, whereas a lighter color might still get highlighted by the lights. Matching thread is, I think, one of the things that I enjoy most when we are doing treatments. It can be challenging but very satisfying when it works out.

Why do you use a curved needle to stitch?
For conservation stitching, we use a range of needles. You can see that I have a selection of curved needles of different sizes and curvatures. I also have some straight needles and various types of pins for this treatment.
Because the altarpiece is large and heavy, I am not able to check the reverse as I stitch. I want to handle it as few times as possible. So, for this treatment, I have chosen to use a curved needle with a sharpish point which allows me to stitch through all the layers of the edge of the textile while allowing it to lay flat and be fully supported by the table.
Quite often conservation tools overlap with tools from other professions. Our needles are sourced from surgical suppliers, and they are sold for eye or intestinal surgery. They are slightly stronger and sharper than the needles used for hand sewing.
Tell me a little about the stitching process.
I am reattaching the metallic fringing to the edge of the metallic ribbon with quarter-inch straight stitches that are perpendicular to the edge of the textile. I am spacing the stitches half an inch apart. As I reattach the ribbon, I will reuse any previous stitch holes that I come across so as to reduce the number of new holes created.
Conservation stitching is a bit different from hand stitching. We do not knot the thread when we start and finish a section of stitching. This is so that there will not be any areas of tension around the knots. We prefer to secure the start and the end of the stitching with some back stitches. Museum textiles, unlike garments or everyday textiles, should not and hopefully will not be handled extensively, so the back stitches should be enough to keep the stitches in place.
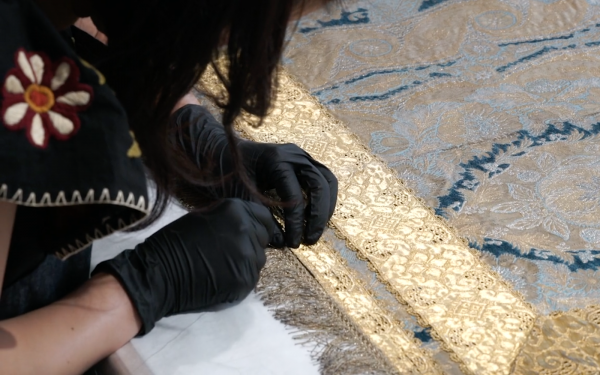
However, there are two things that I am doing for this treatment that are considered unusual in textile conservation. The first is that I am stitching with gloves on. Whenever we work with textiles, we make sure that we have clean, bare hands, because our tactile sensitivity is crucial for assessing how the treatment is progressing. With bare hands, we can identify areas in the textile that might be stiffer or brittle, which would suggest to us that that area had undergone more physical or chemical change, and so we may have to adjust how we are handling that section. But for this altarpiece, I have had wear gloves to protect the metallic components from the oils in my skin. Metallic threads are prone to tarnishing and so when we handle and work with textiles with metallic elements, we will always wear gloves. This does compromise my fingers' sensitivity and reduces the speed of my stitching, as I need to spend more time positioning each stitch, but it is a simple thing to do to aid in the long term preservation of the textile.
The second unusual thing is that I have knotted the end of the thread to the eye of the needle. Typically, this is not done, as it may increase the bulk of the needle end that needs to pass through the layers of textile. However, for this treatment, I felt that the weave structure of both the metallic fringe and the edge of the textile was open enough to allow the needle to pass through. The thread I was using was also a very slippery silk thread which, in combination with gloved sewing, was difficult to manage. By knotting the end of the thread, I was able to make sure that the thread stayed attached to the needle as I positioned the needle through previous stitch holes.
What made this project challenging?
It is really interesting stitching through metallic ribbon just because it has both the quality of finely beaten metal, in that it's very ductile and it's flexible in a way that most woven ribbons are not, but it also still has that woven structure. It moves in a really weird way.
When I am stitching through, I have to anchor the metallic ribbon in place with my left thumb to sort of stop it from shifting or bending, which it does a little bit. My thumb is in place to stop the needle from pushing the ribbon too far out of position and just as a point of tension so that the needle can pass through the layers. Once the needle passes through, I can use my thumb to ease the ribbon back into position.